How do I use a repeatable group to collect multiple entries on a form?
Last updated: June 5, 2026
A Repeatable Group lets employees enter multiple sets of the same information — work history, references, or education records — using a single field definition. You set how many entries they can add; they fill in as many as they need.
Before you start
You have permission to create or edit forms on your account.
The form is open in a draft version. See 📄 Understanding forms for how form versions work.
Steps
Building a repeatable group has three phases: create the group and set a limit, add subfields inside it, then (if the form fills a PDF) map each PDF slot to the right entry index.
Add the group and set a limit
Open the form in the Visual Builder and navigate to the page where the repeating section belongs.
Add a field and choose
Repeatable Groupfrom the field type list. The group appears as a collapsible container in the field list.Give the group a label — for example,
Work history. The label determines the group's field path, which you'll reference when mapping to a PDF.Set
Max instancesto the maximum number of entries an employee can add. The allowed range is 2–50. If the PDF has 10 work history slots, set this to10.
Add subfields to the group
Select the group and click
Add Subfield. Add the fields that should repeat with each entry — for a work history group, typical subfields include employer name, job title, start date, and end date.Each subfield appears once in the builder but repeats for every entry the employee adds at fill time.
Configure each subfield — type, label, required toggle — the same way you would any other field on the form.
Map the group to a PDF
If your form fills a PDF, each physical slot in the PDF needs to map to a specific entry index in the group. The path format uses bracket notation:
First entry:
work_history[0].employerSecond entry:
work_history[1].employer…and so on for each slot the PDF has.
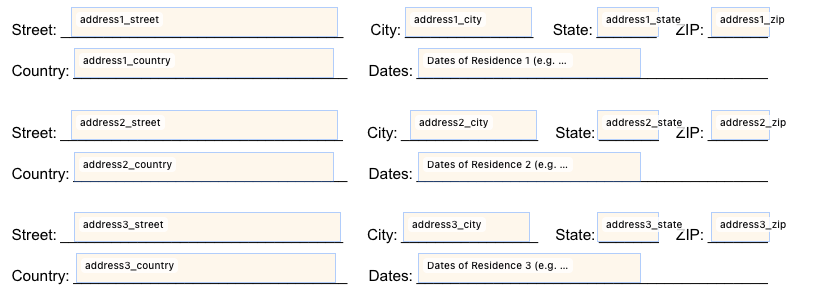
Each annotation box on the PDF must also have a distinct name. Onboarded keys mappings to annotation names — if multiple boxes share the same name (for example, three boxes all called Street Name), they all receive the same mapped value regardless of which bracket index you assign. Name each annotation uniquely before you start mapping: Street 1, Street 2, Street 3, and so on. Below is an example of how this could look.
Open the PDF mapping view for the form version.
Drag a subfield from the field list onto a PDF field annotation. The mapping path defaults to index
[0].Edit the index in the mapping path to target a different slot — change
[0]to[1],[2], and so on. Repeat until every PDF slot has a mapping.
Don't run Auto Annotate once you've started mapping. Clicking Auto Annotate opens a confirmation dialog warning that it will clear all existing PDF field annotations. If you confirm and then click Save PDF, your manual work is replaced. Avoid it once any mappings are in place.
Verify
Preview the form and confirm:
The group renders a single set of subfields with a button to add more entries.
Adding a second entry shows a fresh, blank set of the same subfields.
Attempting to add more entries than the
Max instancesvalue is blocked.
Related
📄 How do I generate form fields from a PDF with AI? (How-to)
📄 Understanding forms (Concept)