How do I send an email from an automation?
Last updated: August 26, 2026
Add a Send Email action, pick a template, and write the subject and body right on the action. Nothing needs connecting first — new email actions send through Onboarded's own email service by default.
Add the Send Email action
Open your automation and find the point in the graph where the email should go out.
Select the add button to insert an action node, and choose
Send Email.
Choose the email service
The Email service dropdown decides who sends the message.
Onboarded Email Service— the default on every new action, and the one to leave selected unless you have a specific reason not to. No setup, no credentials.SendGrid account— your own SendGrid, connected as an integration. Most accounts don't have one. The option shows(not connected)and stays disabled until that integration is configured.
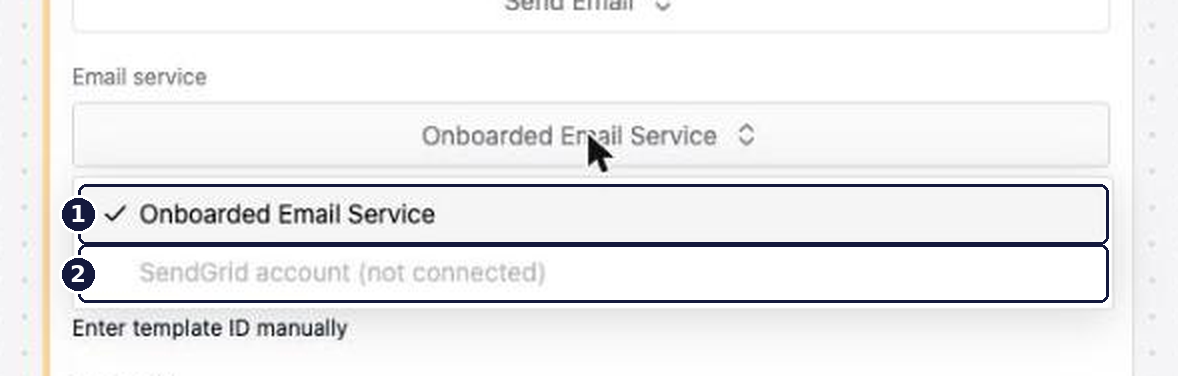
Email actions built before this dropdown existed still point at your own SendGrid. Opening one doesn't move it — that would silently change who sends your live email. If an older automation stops sending after you disconnect SendGrid, open its email action and switch Email service to Onboarded Email Service.
Pick a template
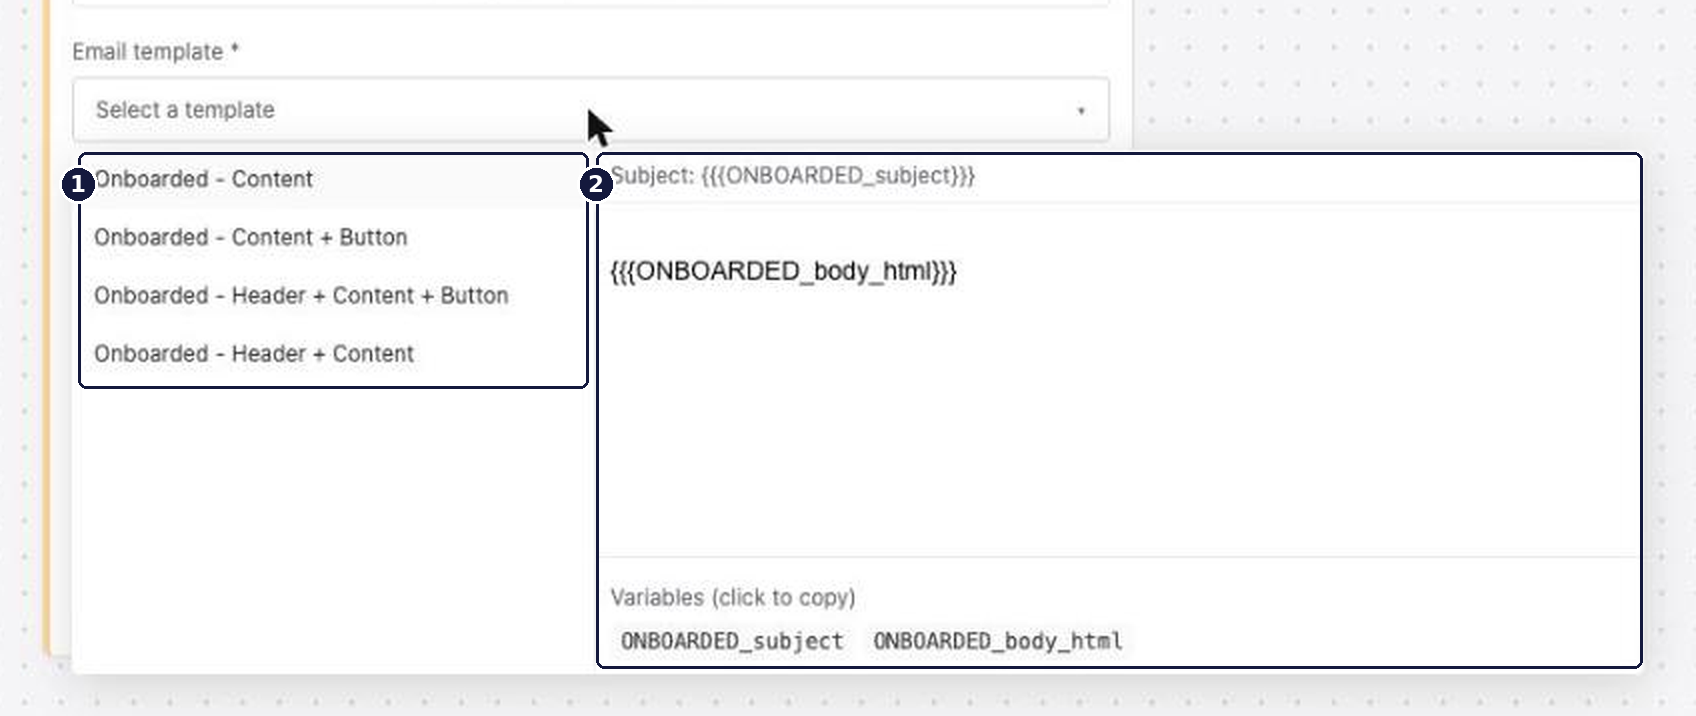
Open Email template and choose from the list. The panel previews each template as you move through it, so you can see the frame before committing. Four standard templates are available, differing only in whether the message opens with your branded header band and whether it ends with a call-to-action button — see 📄 Understanding automation email for the full set.
Choose your recipient
Use the Send email to dropdown to decide how the recipient address is worked out.
Employee(default) — sends to the employee's email address. Available whenever the automation is triggered by an employee fact, which covers most triggers.Custom email address— sends to an address you specify. Useful for internal reviewers, managers, or other stakeholders. The field accepts variables, so you can send to a dynamic address —{{placement.custom_attributes.hiring_manager_email}}, for example.
Write the subject and body
The copy is authored on the action itself.
In
Email subject, write the subject line. Type#to insert a variable —{{ employee.first_name }}, for example.In
Email body, write the message. The editor handles headings, bold and italic, links, lists, and tables, and#inserts a variable here too. For a longer message, select the expand icon to write in a full-size dialog andSavewhen you're done.
Both fields appear once Onboarded has read the selected template. If a template of your own doesn't make room for authored copy, the fields stay hidden and the template's own subject and body are sent as-is.
There's no image tool in the body editor, and that's deliberate. An image uploaded here would resolve to an address that only works inside Onboarded, so it would arrive broken in every mail client. Your logo belongs in the header band instead, which comes from the theme — see 📄 How do I brand an automation email with my theme?.
Map dynamic template fields
Templates can reference named variables beyond the subject and body. Selecting a template scaffolds a row under Dynamic Template Data for each one it expects, with the name filled and the value blank, so you mostly fill in values rather than invent names.
To add one yourself, select Add Template Field, put the variable name under Email Variable, and put the expression under Value. A row with a blank value isn't saved.
You don't need to add rows for the theme's branding or for the subject and body — Onboarded fills those. For the full catalog, see 📄 Automation email template variables.
System properties and custom attributes are different paths
Two kinds of fields can carry the same human label while living at completely different paths. Knowing which one you're pointing at is the difference between a populated email and a blank one.
A system property is built into Onboarded.
employee.start_dateis one of these — and it's the one that catches people out. It is not a core employee attribute and it is not one of the default facts. It's sourced from a form field: theEmployee's first day of employmentfield on the standard I-9, which also appears on the federal W-4. Until a form carrying that field has been submitted,{{employee.start_date}}resolves to nothing.A custom attribute is one your account defines. It lives under its own namespace —
employee.custom_attributes.<slug>orplacement.custom_attributes.<slug>— and carries whatever your account writes into it.
So an account can hold a start date in two places under the same label. {{employee.start_date}} and {{placement.custom_attributes.start_date}} are separate paths, and one will not fall back to the other. For everything available without configuration, see 📄 Facts available by default.
If your automation includes prior actions, their outputs become additional variables. After a Create Onboarding Link action named create_onboarding_link, you can reference {{create_onboarding_link.onboarding_link}}. The action's name in the builder becomes the variable namespace.
Formatting a date
Dates reach the email as raw strings. A date fact serializes to ISO-8601 UTC — 2026-08-06T23:59:59.000Z — and a date form field submission renders like 1990-01-01T00:00:00. Neither belongs in an email.
Use Liquid's stock date: filter to format one: {{task.due_date | date: '%B %d, %Y'}}.
Onboarded's own filters — parseDate, fillEmptyWith, checkbox, equal, contains — are not available in the email action, even though the automation editor's variable helper lists them. Copy a parseDate example over from a PDF field and it won't format, and it won't raise an error. Stick to stock Liquid filters here.
Verify
Save the automation and trigger it against a test placement — see 📄 How do I test an automation before publishing?. Open the delivered message and confirm the subject reads correctly, the body rendered with its paragraphs intact, and every variable resolved to a real value.
Why a placeholder comes through blank
The email arrives and a sentence ends mid-thought — Your first day is, then nothing. That's a path that resolved to no value. Two causes account for most of them.
You picked the wrong path. The variable picker lists fields by their label and shows the path underneath as secondary text. A system property labelled
Start dateand a custom attribute labelledStart datelook nearly identical in the dropdown, which is how the wrong one gets selected. This is the most common cause.The action that produces the value runs later. A variable from another action has to be created upstream of the
Send Emailaction in the graph.
What makes this hard to spot is that your two vantage points disagree. In the delivered email, a missing value renders as an empty string — nothing appears, and nothing flags it. In the automation's Events → Data view, the same value shows as null. The email gives you no signal. The Events panel does.
Open the
Eventspanel for the automation run.Select the action block you're troubleshooting.
Open the
Datatab and read the JSON. A path sitting atnullis the one dropping out of your email.
Once you know which path is empty, check whether you selected the system property when you meant the custom attribute (or the reverse), and confirm the form or field that populates it has actually been submitted. For a walkthrough of the panel itself, see 📄 How do I check an automation's run history with the Events panel?